|
|
|
Kto jest w sklepie?
Sklep przegląda 5871 gości |
|
Kategorie
|
|
Informacje
|
|
Polecamy
|
|
|
 |
|
|
Dla tego produktu nie napisano jeszcze recenzji!
 ;
jedyne do czego mogę mieć zastrzeżenie to jakość zdjęć zawartych w przesłanej instrukcji serwisowej ponieważ są fatalnej jakości, praktycznie nieczytelne. tak poza tym jestem zadowolony to jest to czego szukałem.
 ;
Wszystko w porządku.
Instrukcja czytelna i kompletna.
Dziękuję.
all right!
thank you.
;
Bardzo dobra instrukcja. Zawiera wszystko co potrzeba, polecam!
;
Instrukcja jest OK. Schematy czytelne, opisane niektóre procedury.
;
Instrukcja bardzo czytelna. zawiera co potrzeba. Polecam
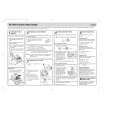
3) PRINTER TEST
1 Key operation 102 3 RCPT/PO 2 Test procedure
5) MODE SWITCH TEST
1 Key operation 105 3 RCPT/PO 2 Test procedure
OP display
R/J
PRINTER
PGM
OP display
Enlargement
MODE 105
SW
PGM X
MODE: PGM_VOID_OFF_OP X/Z_REG_MGR_X1/Z1_X2/Z2__PGM X:1 2 9 3 4 5 6 7 1
The above X must be read in the correct order. (If the contact is open, 9 will be displayed.)
5 lines of 24 digits are printed.
3 Check: The display during testing and the content of the completion print.
At the receipt side, the logo is also printed and the receipt is issued. 3 Check that: The print is free from contamination, blur, and uneven density. 4 End of testing The test will end automatically.
4 End of testing When the test ends normally When an error occurs: E�~�
105 105
6) PRINTER SENSOR TEST
1 Key operation 106 3 RCPT/PO 2 Test procedure Check the status of the paper end sensor and head up sensor.
4) KEYBOARD TEST
1 Key operation _ _ _ _104 3 RCPT/PO 2 KEY check sum code 2 Test procedure The keyboard is checked using the sum check code of the key code. If the sum check code is not entered, the check is made using the sum check code of the default keyboard arrangement The sum check data for each model is entered to the front 4 digits of the DIAG code, and that data is compared with the key data added until the final key (CA/AT) is pressed. Both data are the same, the test ends, printing the number given below. If both data are different, the printer prints the error message.
OP display
R/J 106
SENSOR
PGM XY
3 Check the following. X: 1 - Paper present at the receipt side O - No paper at the receipt side Y: 1 - Paper present at the journal side O - No paper at the journal side 4 End of testing
OP display
KEY 104
BOARD
PGM
You can exit the test mode by pressing any key and the printer prints the following.
106
KEY CODE
7) CLOCK TEST
1 Key operation 107 3 RCPT/PO 2 Test procedure
3 Check: A) The content of completion print 4 End of testing When the test ends normally: When an error occurs: Note: Calculation of key sum check data Hard codes (hexadecimal number) at the position (excluding feed key) where there is an input data contact are added. However, the end key (TL) is not added. This data to which hard codes have been added is converted into a decimal number value, which will become the sum check data that will be entered when DIAG is started.
XE-A301V
104
E�~�
OP display
104
T I ME R 104
CHECK
PGM
Hour
Min.
Sec.
Blinks at an interval of 0.5 sec.
3 Check that: ��� blinks and the clock counts up.
DIAGNOSTIC PROGRAM
� 11 �
|
|
|
> |
|